2/26/2014

A Design for the Chalkboard Backsplash

I don't know if it's the winter blues or what, but I've been questioning my ideas a lot (do I have any CLUE what I'm doing?!) so I kept waffling about a design for the kitchen backsplash. But then I realized hello it's a  chalkboard wall and if I don't like it, it can be erased or even painted over.
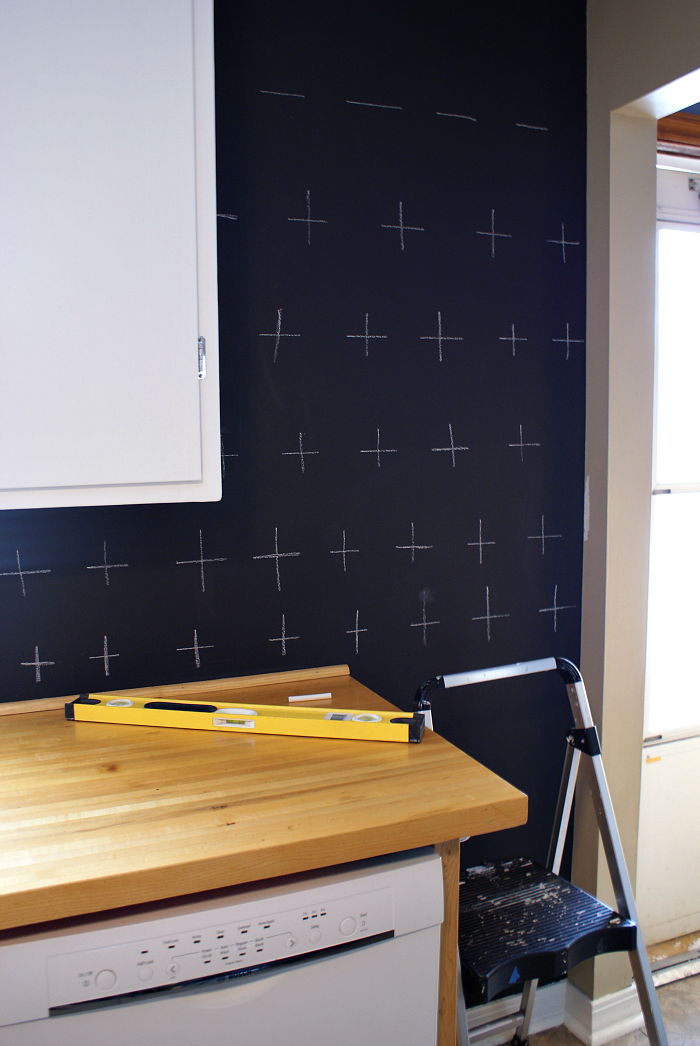
Budget kitchen update. Chalkboard paint back splash with plus signs. Butcher block counter tops
I gave it a shot and I'm so happy with the results! The plus signs are so fun; they and add a layer of interest and quirk to the kitchen. Confidence (somewhat) restored!


I'm very fortunate to live within blocks of my office so I usually come home at lunch to let the dogs out and make a sandwich. Yesterday, while I was waiting for my grilled cheese (or Croque Monsieur, if you're fancy!) I ran out to the garage and grabbed one of Jesse's levels. Adding the plus signs to the back splash was super quick and I nearly finished before it was time to head back to work.
Budget kitchen update. Chalkboard paint back splash with plus signs. Butcher block counter tops
still can't believe what a difference the white cabinets make, the house is so much lighter and brighter! We don't have many windows (which I''m only recently noticing since I'm taking photos) and the white paint helps reflect the light we do have. 
Budget kitchen update. Chalkboard paint back splash with plus signs. Butcher block counter tops

Overall, I'm pretty happy with our budget makeover. This post has pics of how it looked when we moved in and where we started back around Christmas. 


If you have old dingy cabinets that you are considering painting, please give it a shot! It's tedious, but you can do it!


This post is linked up with
Life in Velvet Thursday S.T.Y.L.E  #9
Remodelaholic Weekend Link Park 2.28.14
Classy Clutter Spotlight Saturday 3.1.14
Liz Marie Blog 5.22.14

2/22/2014

Progress in the Kitchen - White Painted Cabinets and Chalkboard Backsplash

I wrapped up our cabinets last week, but the very next day I came down with a nasty cold turned sinus infection. Wah Wah...Fortunately, I'm feeling much better today, so I snapped a few photos during B's nap.

As expected, painting the cabinets white was a very tedious project that took ages to complete. But I'm wild about the results! I think the contrast of the white cabinets against the chalkboard backsplash looks fantastic with the butcher block counters. It's a huge improvement over where we started when we bought the house!
Budget Kitchen Update White Cabinets Black Chalkboard BacksplashI work full time, so this project was all about squeezing in ten minutes here or an hour there until it was finished. The trick is to wrap up your paint tray and brushes with plastic wrap, then you can paint for several days without washing and drying your brushes. At one point, Jesse busted me adding a quick coat of paint to the doors right after work...In my favorite black dress and heels!
Budget Kitchen Update White Cabinets Black Chalkboard Backsplash
I divided the project into thirds, taking down the bottom cabinet doors first. I spent a few minutes sanding each door to remove any drips or bumps from the previous brown paint. Then each door was wiped with a damp cloth to remove the dust, followed by several coats of white paint with light sanding in between and a finish sanding at the end. Easy work, but tedious. Very tedious.
Budget Kitchen Update White Cabinets Black Chalkboard BacksplashI replaced the three round drawer pulls with cup style pulls, but reused the rest of the hardware. It's inexpensive brushed nickel that I purchased few years ago. Hardware like this might be nice to have someday, but the handles I have work and look good, so there's no rush.
Budget Kitchen Update White Cabinets Black Chalkboard Backsplash


Budget Kitchen Update White Cabinets Black Chalkboard Backsplash

Budget Kitchen Update White Cabinets Black Chalkboard BacksplashI have two more  (maybe three) small projects on my list and this super low budget face lift will be all wrapped up!

Here's where the budget stands so far:
Frog tape - $6
Foam rollers - $6
Plastic paint Trays - $5
Angled two inch trim brush - $8
Sanding paper - I like the purple stuff from 3M - $10
Painting pyramids - $7
Gallon of satin paint (Silent White by Clark and Kensington) - $30
Quart of Chalkboard paint (Rustoleum) - $12
Cup drawer Pulls x 3 = $15
Hanging planter - $12
Cloth napkins for recovering barstools - $6
Under sink Organization - $75
Total Project Cost = $192

Lastly,  just because I personally enjoy collages and before and after images...
Budget Black and White Kitchen with Painted Cabinets
This post is linked up with

The Be Bold Challenge Link Party

2/13/2014

Easy DIY: How to Make a Simple Plant Hanger

When I saw this DIY on Deuce Cities Henhouse, I felt inspired to add a similar plant hanger to our kitchen window once everything was painted white. My plant hanger ended up being a lazy woman's version (It's Layzay Macrame!), with only two knots and no beads, but I think it's pretty cool.
how to make a simple plant hanger using rope and two knots


What you need for this project:
Two eight foot pieces of accessory cord, rope, twine, etc.
A screw in hook
A nifty ceramic pot - mine is from the goodwill!

Step 1 - Put the two pieces of cord together and then tie an overhand knot in the middle, leaving a loop at the top for your hook. This will make four strands.


Step 2- Bunch the four strands together at what will be the bottom and tie another overhand knot.
how to make a simple plant hanger using rope and two knotsStep 3 - Trim up the end pieces. You may want to melt the ends using a match to keep them from fraying. I recommend doing this outside because...hello fire...and it can be smelly.

Step 4 - Screw a hook into the ceiling of a well lit area, like a kitchen window!

Step 5 - Add your nifty pot and plant.
how to make a simple plant hanger using rope and two knots

how to make a simple plant hanger using rope and two knots
I love this plant hanger because it's kinda chic and is also a small nod to our love for rock climbing. The material is accessory cord that's frequently used for various outdoorsy things. We've been on a hiatus for the past couple of years, but Jesse and I used to climb like mad and take weekend road trips all over the place. Jesse recently started building a training wall in the basement, so I'm hoping we'll be back to our sport / hobby soon..This time with B in tow!
This post is linked up with

2/12/2014

Free Valentine's Day Printable

B's preschool Valentine's Day party is tomorrow. I kinda wish I could go. I mean, a bunch of three year old kiddos decorating cookies, playing games and handing out Valentines? Cuteness through the roof!
About those Valentines...I'm not exactly a health nut, but I am health conscious and it seems like sweets always find a way to our house without us even trying. Therefore, I definitely wanted to do a non-candy valentine treat and I thought stickers would be fun.
I made little valentine labels using picmonkey and attached them to sheets of stickers. B had fun "helping" me and loved picking out Valentines for his best buddies.

Me: Do you think so and so would like the monsters or the animals?
B: Well...actually...he doesn't like monsters. Monsters are scary...He'd like the animals!

Free Valentine's Day Favor Printable


If you need a last minute valentine, you can download a free printable here.

Happy Valentine's Day, Everyone!

This post is linked up with:
Link Party Palooza 1.9.15

2/09/2014

Easy DIY: Organizing Under the Kitchen Sink

The cabinet under our sink was a gross and disorganized mess. So while I was spending time painting the kitchen cabinets I resolved to do something about it. Part of my organization mission included a ten minute project to hang my kitchen gloves under the sink, more on that in a minute.
First, here is what the cabinet under the sink looked like before I started.  The shelf paper was old and grimy, I couldn't see or easily access half the cleaning supplies and I definitely couldn't reach the fire extinguisher quickly (see it hiding in the back left?).
This was a project I really wanted to tackle but I was also dreading it. Seriously, have you ever cleaned and painted the under side of a sink? In my experience, under sink cabinets have always been gross. And cramped. And smelly. I don't know how plumbers can stand it, but I'm so thankful they do! 
First I hauled everything out, then I grabbed a beer (or two), the vacuum and some soapy water for a good cleaning.  The clean out was followed by fresh paint and shelf paper.  By the way, let me know if you need any shelf paper, I have 98% of a roll left over from this project! 

Here's what it looks like with fresh paint and some organizational elements. Ahhh, so much better! Goodbye yucky cabinet! Hello clean and organized under sink storage!
Easy DIY Organization Under the Sink
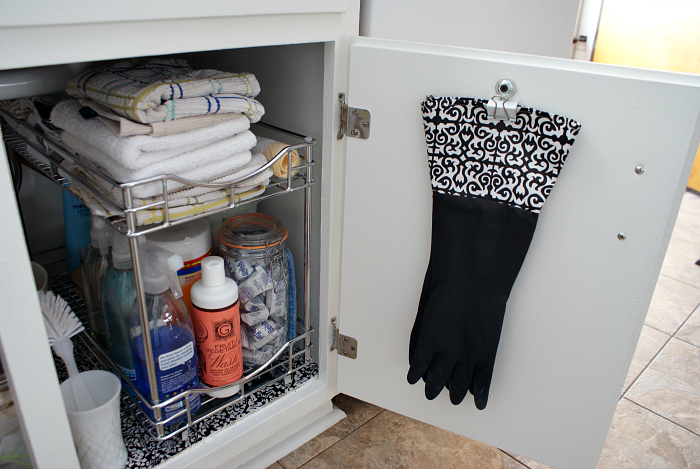
I purchased a chrome roll out drawer  and it was a bit of a splurge, but oh my gosh it was so worth it! I can store twice as much stuff and have easy access to it. The bottom shelf holds everyday cleaning supplies, dishwasher tabs and plastic shopping bags (they're in a Snapware cereal keeper similar to this while hand towels are conveniently located on the top shelf. 
I also wanted a handy place to store our reusable shopping bags - they were previously hanging on a nail by the back door. I found this this red woven basket at the Goodwill (my favorite place to find baskets!) and it's perfect for the job. 
Easy DIY Organization Under the Sink
Now for the nifty kitchen glove holder. I don't use my kitchen gloves very often, but on the rare occasion that I have manicured nails I like to keep them nice for as long as possible! Here's how to do this quick and easy DIY.
All you need are two washers, a nut, a screw and a binder clip. Sandwich one end of the binder clip between two washers. Secure the nut, screw and washers in place using a drill.  Easy Peasy!
Easy DIY Organization Under the Sink
So that's my under sink makeover! Have you tackled any yucky storage areas lately? I'd love to hear about it in the comments!

Keep in Touch by Following Me on Bloglovin'!

This post is linked up with:
Clean and Scentsible's Inspiration Exchange No. 36
Remodelaholics Anonymous Weekend Link Party 2.14.14
Sunday Soiree Link Party 4.27.14