4/22/2015

DIY Travel Pillow, Plus a Pillow Cubes Giveaway!


(This post is sponsored by Pillow Cubes)
We are getting so psyched for our Disney World vacation! Jesse and I have been working on stressful projects at our jobs, so it will be nice to relax for a few days. And yes, the way we do Disney is relaxing - it's all about planning ahead, starting with the travel! tutorial: easy DIY travel pillow
When Pillow Cubes sent me a sample insert for review, I thought a travel pillow for B would be a good way to put the product to use. Have you heard of Pillow Cubes? They sell all kinds of pillows in bulk packages, which helps cut down on shipping cost. And, AND they are made in America! Pillow Cubes is a great resource if you need a bunch of pillows for a project. I've been slowly switching our toss pillows from poly to down. I'm almost finished, but if I had known about Pillow Cubes a couple months ago I probably would have bought a case and called it good.

The folks at Pillow Cubes also giving away 12 x 16 sample pillow of choice to one lucky reader, so be sure to enter the giveaway at the bottom of the post.

Supplies for travel pillow:
12 x 16 pillow
1/2 yard of fabric (mine is super soft stuff from JoAnn)
Package of orange elastic (also from JoAnn)

tutorial: easy DIY travel pillowStart by cutting two 13 x 17 pieces of fabric and pinning them right sides together. Sew three sides, leaving one of the short sides open.
tutorial: easy DIY travel pillowOn the side that's not sewn, fold over and press and pin the edge, then sew.
Next, cut a piece of orange elastic (about 9 inches) fold it half and pin the ends to the inside of the pillow along the hem. Use a few tack stitches to hold in in place. These stitches don't have to look good, you will remove them at the end.
tutorial: easy DIY travel pillow
tutorial: easy DIY travel pillowTurn the pillow case right side out and smoosh the pillow down inside it. Then close up the ends using two rows of pins. The second row helps make space for your sewing machine foot, otherwise you'll be fighting the bulk of the pillow.
tutorial: easy DIY travel pillow
Sew along the edge, removing pins as you go. Then trim all the treads, remove the tack stitches and fluff up the pillow filling. Now snuggle up and enjoy your soft and cozy travel pillow!
tutorial: easy DIY travel pillow
Overall, I'm really happy with my Pillow Cubes insert, it's soft, fluffy and well made. Their online checkout was simple and the pillow arrived within a couple business days, easy peasy! If I made another travel pillow, I'd probably go for the down rather than the poly since down tends to compress better, but that was on me since my first idea was to make an outdoor pillow (poly is better for outdoor use) but changed course mid-stream. I hope you stick around and enter the giveaway, if you win, go for the down! ;-)

a Rafflecopter giveaway

This post is linked up with:

4/15/2015

Betty Draper Inspired Office


I've been hoarding collecting Mid Century Modern furniture since college. I'm always searching for something, so I hit up estate sales and thrift shops during lunch and frequently peruse the Mid Century Modern section on Chairish. Back in college, I was just trying to furnish my place on a budget, and I knew I liked "50's style" furniture. I remember my first awesome find like it was yesterday. *Cue cheesy flash back music*

I spotted a pair of  nearly perfect condition wood frame lounge chairs at the Salvation Army. When I asked a shaggy haired kid behind the counter about the price, he shrugged and said "fifty?" I thought he meant fifty each, but he meant for the pair. Oh, the pure joy! A few years later, after an abandoned attempt at re-finishing the chairs, I sold them to a friend. Oh, the deep regret! Whenever I visit her house, I can feel those chairs staring at me "why did you sell us?!" I'm only slightly kidding, of course, my friend loves the chairs and I'm pretty sure she knows I'd buy them back in a heartbeat. Angel, if you are reading this, don't you dare get rid of those chairs!

When the folks at Chairish contacted me about putting together a Mad Men inspired room using items available on their site, I was literally wearing my favorite Betty Draper inspired outfit. Earlier in the day, I had snapped an Instagram pic and cheekily titled the post "Betty Draper gets a job." Total kismet! So, in a fan-fic type moment, I thought, "What if Betty had a Madison Ave. office? What would her rad lady-boss office look like?"

Mad Men Inspired Feminine Office

I think Betty's office would be chic as hell. Modern yet feminine, with pink sofas, gold accents and art that references her past experiences. I'm not sure if she'd serve hard booze though, she's more of a day wine drinker.

Most of these peices are way out of my price range, but it's fun to play around with different looks just for fun and inspiration. I should note that on Chairish you can make an offer on most pieces, so if you live near the seller, you could probably negotiate on price. I think my favorite thing aside from the sofa set is the ceiling light, and the pair of lamps, I have a thing for lamps. What's your favorite piece?

1. Solid Brass Mid Century Ceiling Light
2. Mid Century Fashion Print
3. "Misty Village" Lithograph by Bogdan Grom (not mid century, but I think it works)
4. George Nelson Sofa and Chair Set
5. Horse Head hooks
6. Walnut and Mahogany Mid Century Desk
7. Mid Century Murano Glass Lamps
8. Set of Georges Briard Glasses with Cady
9.Mid Century Italian Bar Cart

P.S. - This is not a sponsored post, I just dig Mad Men, style boards and Chairish.


4/06/2015

How to Tuft a Headboard


A couple years ago, before I started blogging, Jesse made a wall mounted plywood headboard for our bedroom. Originally, I covered the headboard with a yellow and white damask, which looked lovely. But, of course, I got the itch to swap the color and I also wanted to give it a more finished look using tufts. Like most of our projects, we eeked out the headboard makeover a few minutes at a time until it was finished, so it took about a week. A bit of a time investment, but it was inexpensive, looks fab and now I know how to tuft! 
How to Tuft a Headboard, Turquoise Tufted HeadboardThe plywood headboard mounts to the wall using a french cleat, which means angled strips of wood attached to the headboard and wall fit together kinda like puzzle pieces. Unfortunately, I don't have photos of the process, so this post is mainly about how to tuft a completed headboard. However, Jesse sketched out detailed plans for me to post in case you want to give it a go. If you have a question about the construction, please shoot me an email and we'll do our best to answer it!

Supplies for Upholstering and Tufting:
measuring tape, pencil
drill with 1/8th in. drill bit
quilt batting (about 4 yards)
upholstery fabric (I used a curtain panel from Target)
staple gun
10 mm Staples
upholstered buttons
backer buttons
longish sewing needles with large eyes
waxed button thread
scissors

First, Jesse took the headboard off the wall and removed all the staples from the original upholstery job (meanwhile, B and I built a marvelous fort under the dining table). Jesse measured and marked out three rows of tufting holes. All of them are 6 and 7/8ths inches apart, drilled with a 1/8th inch drill bit.
how to tuft a headboardOnce the holes were drilled, I used a staple gun with 10 mm staples to upholster the headboard with a double layer of quilt batting and a curtain panel. I stapled on the batting first, then the curtain panel, pulling everything snug, but not super tight. Then I flipped over the headboard and used a steamy iron to smooth out the fabric.
How to Tuft a Headboard, Turquoise Tufted Headboard

How to Tuft a Headboard, Turquoise Tufted Headboard
Sewing the tufts was fairly simple once I figured out the technique, the crumby part was making all of the upholstered buttons. Since I was using a heavy-ish curtain panel, a craft button maker wouldn't work. Fortunately, I found a good tutorial that explained how to sew little covers for each button. It was crazy tedious, and my fabric kept unraveling so I also had to treat each circle with Fray Check before sewing it around the button. Fun stuff.  On the bright side, I had an excuse to sit and re-watch a few episodes of Mad Men (brushin' up for the finale!). 
How to Tuft a Headboard, Turquoise Tufted Headboard
About the tufting technique. I'm not a professional and I've never tufted anything before, this is just what worked for me and it was pretty simple. If you've never tried tufting, I hope you give it a shot! Now that I know how to do it, I want to tuft everything! Plus, I have a bunch of waxed thread leftover so, obviously, I need to buy a sofa or something to use the rest on!
How to Tuft a Headboard
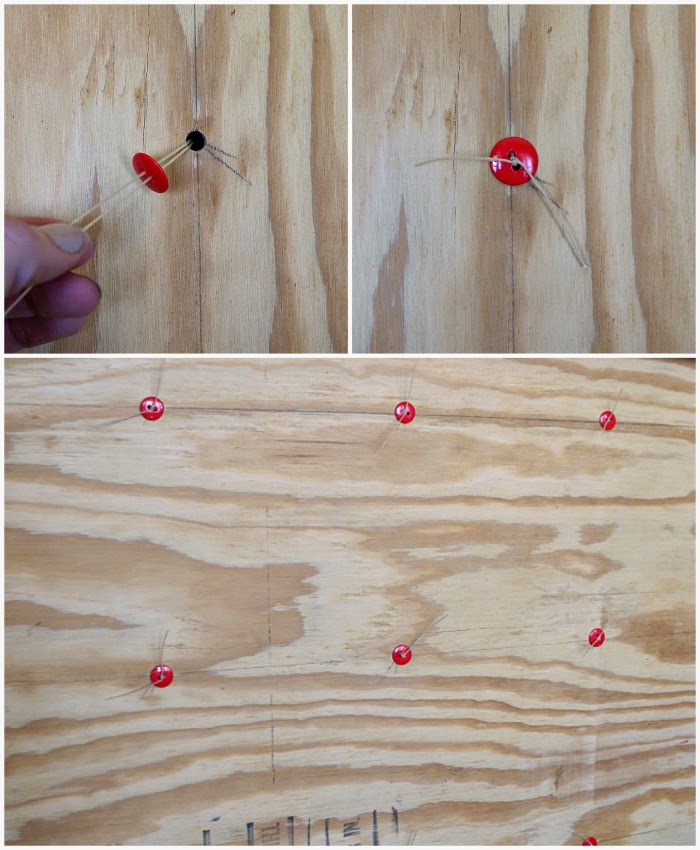
The directions on the waxed thread started by girth hitching the button shaft but that would have been impossible since there was so much fabric junk around the holes. My solution was to thread a sewing needle with waxed thread and poke it through. Then I pulled the thread almost all the way through the other side, leaving a tail which I double knotted. The wax on the thread is really grippy, so it made the knot nice and tight.  
How to Tuft a Headboard
Next, I poked the threaded needle through one of the tuft holes and pulled it through on the other side, drawing the upholstered button close to the headboard. I could kinda feel the holes through the fabric and batting on the front, but it was tricky, so figured out that if I poked a sewing needle part way through from the back it worked as a sort of marker. 
How to Tuft a Headboard, Backer Buttons
On the back side, I snipped the threads so I could add a backer button. Then I pulled the threads tight and double knotted them. It was a little slow going because the wax from the thread kept gunking up the eye of my sewing needle. When I do another tufting project, I'll definitely try to find needles with larger eyes.

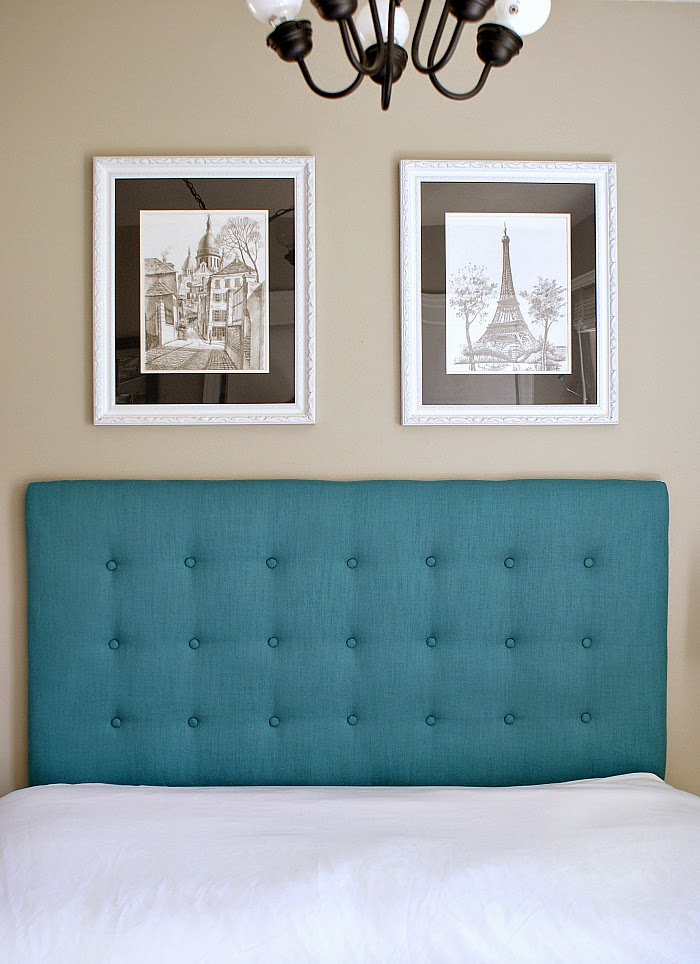
Here are a few pics of the finished product. Normally, there is a mountain of pillows on the bed, but I left them off so you could see the entire headboard.
How to tuft a headboard, teal tufted headboard


diy teal upholstered headboard
I'm lovin' this headboard, I think teal / turquoise is officially my favorite color. I use it everywhere in the house and last week I counted six shirts in my closet that were the same shade! Funny how that works. 

Lastly, just for funsies, Roxy Dog enjoying the freshly made bed :)